A DaVinci Resolve effect by 1LineArt Studio
Picture-in-picture that animates itself.

1LineArt Dynamic PiP shrinks any clip into a rounded window with a self-drawing border, soft drop shadow, smooth zoom, and subtle camera shake — no keyframes required. Everything is controlled from one panel, and the effect automatically adapts to vertical, square, and landscape timelines.
See it in action
Five sections, everything in one place
Every setting lives in one Inspector panel, grouped the way you work: the picture shape, the mask and border, the shadow, the zoom and the shake.
- 1
PIP ShapeCircle, Square, Rounded Square (default), Polygon or Star, with size, corner radius, rotation, sides, points and depth.
- 2
PIP MaskMask center, aspect adaptation, border style, width, timing and color.
- 3
PIP ShadowEnable switch, strength, angle, distance, blur and shadow color.
- 4
PIP ZoomZoom scale, in/out speed in seconds, easing, Damped Harmonic a, b and f, anchor and margin.
- 5
PIP ShakeEnable switch, shake center, motion scale and speed scale.
The first half-second of the clip (0.5 s by default) plays the Damped Harmonic IN, the middle holds, and the last half-second plays the Damped OUT. Trim the clip to the length you want on screen and the animation follows. No keyframes are needed.
What it does
A finished PiP look in one drag
Six things it handles for you, so you stop building the same PiP by hand.
Five picture shapes
Circle, Square, Rounded Square (the default), Polygon and Star. Each has its own size, corner, rotation, sides, points and depth controls, and the same pixel size on 9:16, 1:1 and 16:9.
Self-drawing border
Choose a write-on outline, a static outline or a fade-in outline, with its own width, color and in/out timing.
Drop shadow
Switch it on or off and tune strength, angle, distance, blur and color.
Damped Harmonic zoom
A physics-based damped-oscillation move in and out, with no keyframes. Tune scale, anchor, speed and the equation's a, b and f, or pick another of seven easing curves.
Subtle shake
A layered, organic camera-style motion with its own center, amount and speed — or turn it off.
Any timeline
Reads your timeline's resolution and frame rate, so vertical, square, landscape and custom formats all behave.
The collection
78 reusable macros, one per look
Every macro is a separate .setting with its own thumbnail and embedded documentation. The full list is in the Installation and Usage Guide and in CATALOG.txt inside the download.
The math
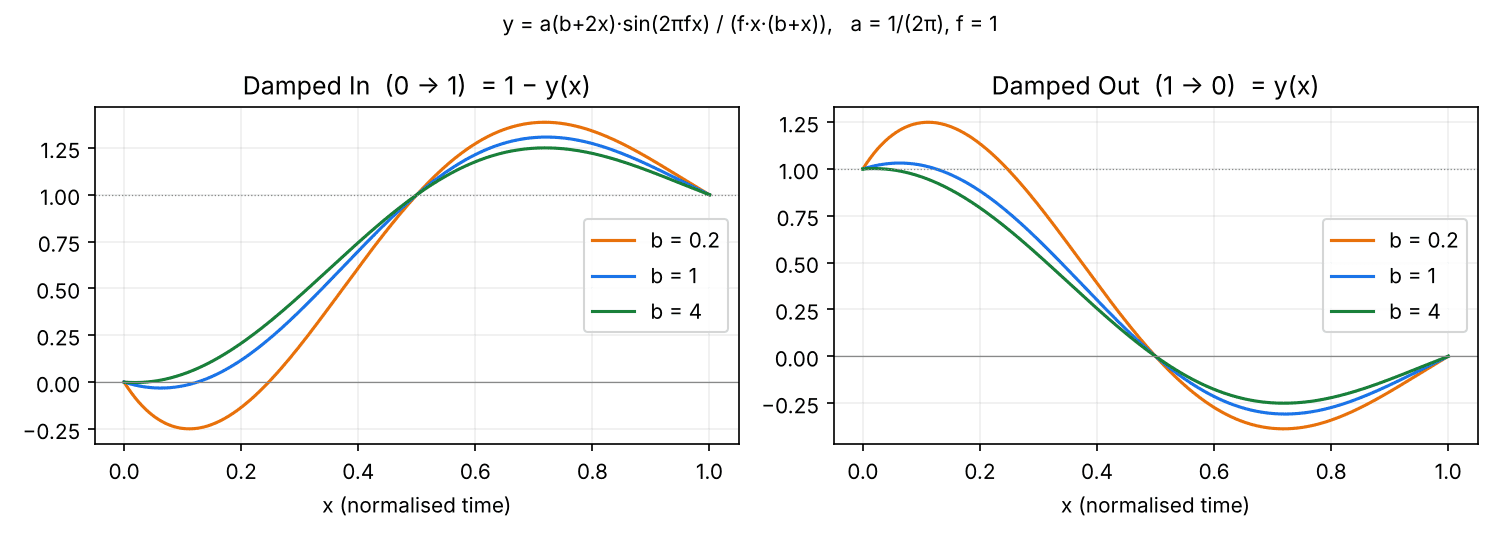
Damped Harmonic easing, from the real equation
The default easing is evaluated directly from the equation, not drawn by eye.
y = a (b + 2x) sin(2π f x) / ( f x (b + x) )
- x is the progress of the move, 0 to 1. Damped Out uses
y(x); Damped In uses1 − y(x). - a (amplitude) defaults to
1/(2π), because the limit of y at x → 0 is 2πa, so y starts at exactly 1. - b (damping, default 1): the envelope
(b + 2x) / (x (b + x))decays roughly as 1/x. Smaller b gives a longer, stronger wobble. - f (cycles, default 1): whole oscillations per move. The phase is zero, so y(1) = 0 for whole f.
Reference
Every control and its default
Pick a section to see what each control does and the value it starts at.
| Control | What it does | Default |
|---|---|---|
| Picture Shape | Circle, Square, Rounded Square, Polygon, Star or Rounded Rectangle. | Rounded Square |
| Shape Size (Mask Width) | Size as a fraction of the timeline's short side (1 = the whole short side of the clip). All shapes except Rounded Rectangle are square-based, so they look the same on every aspect ratio. | 1.0 (window = Zoom Scale 0.35) |
| Corner Radius | Rounded Square and Rounded Rectangle: 0 sharp, 1 fully round. | 0.2 |
| Shape Rotation (deg) | Turns the shape; the rotation eases in with the zoom. | 0 |
| Polygon Sides | Polygon only: 3 to 12 sides. | 6 |
| Star Points | Star only: 3 to 12 points. | 5 |
| Star Depth (Inner Radius) | Star only: inner radius divided by outer radius. Low is spiky, high is a fat burst. | 0.45 |
| Rectangle Height | Rounded Rectangle only: height in 9:16 reference units (width × 0.5625 is a square). | 0.5625 |
| Control | What it does | Default |
|---|---|---|
| Mask Center (X, Y) | Which part of the clip is shown inside the shape. | 0.5, 0.5 |
| Mask Aspect Adaptation | Auto keeps the shape's pixel size on any timeline; Off treats the size as plain fractions of the frame. | Auto |
| Border Mask Version | V1 Write-On Outline, V2 Static Outline or V3 Fade-In Outline. | V1 |
| Border Width | Thickness of the outline. | 0.005 |
| Border Animation In / Out | Seconds the outline takes to appear and disappear. | 0.5 s each |
| Border Color | Click the swatch and choose any color in the system Colors window. | Orange |
| Control | What it does | Default |
|---|---|---|
| Enable Drop Shadow | Turns the shadow on or off. | On |
| Shadow Strength | Opacity of the shadow. | 0.5 |
| Drop Angle | Direction the shadow falls. | 45 |
| Drop Distance | Offset of the shadow from the window. | 0.02 |
| Shadow Blur | Softness of the shadow edge. | 0.25 |
| Shadow Color | Click the swatch and choose any color in the system Colors window. | Black |
| Control | What it does | Default |
|---|---|---|
| Zoom Scale | Final size of the PiP relative to the full frame. | 0.4 |
| Zoom Speed In / Out (sec) | Seconds the zoom takes at the start and end of the clip (frame-rate independent). | 0.5 s each (12 frames at 24 fps) |
| Pivot Point (X, Y) | The point the zoom scales toward. Used only when Pivot Mode is Manual. | 1.194832, -0.1741408 |
| Easing Curve In / Out | Damped Harmonic, Linear, Ease In (Quad), Ease Out (Quad), Ease In-Out (Sine), Ease In-Out (Cubic), Ease In-Out (Quintic) or Elastic Overshoot. | Damped Harmonic |
| Damped Amplitude (a) | Amplitude of the equation. 1/(2π) makes y(0) = 1 exactly. | 0.159155 |
| Damped Damping (b) | Damping term. Smaller = longer, stronger wobble. | 1 |
| Damped Cycles (f) | Whole oscillation cycles per move. 1 is the published equation. | 1 |
| Transition Style | Shrink to PiP (from the full frame) or Pop Scale (grow from the anchor). | Shrink to PiP |
| Pivot Mode | Auto Anchor (Window Anchor + Edge Margin, any aspect) or Manual (Pivot Point). | Auto Anchor |
| Window Anchor (X, Y) | Where the window settles: 0,0 bottom left to 1,1 top right. | 1, 0 (bottom right) |
| Edge Margin | Gap to the frame edge, as a fraction of the short side. | 0.03 |
| Control | What it does | Default |
|---|---|---|
| Enable Transform Shake | Turns the shake on or off. | On |
| Shake Center (X, Y) | Origin the shake moves around. | 0.5, 0.5 |
| Shake Motion Scale | How far the PiP drifts. | 0.1 |
| Shake Speed Scale | How fast it drifts. | 0.2 |
Compatibility
Works on any timeline, any frame rate
The effect reads your timeline's resolution and frame rate on its own. Positions, sizes, pivot and border are stored as 0–1 fractions, never fixed pixels.
Default Rounded Square, Zoom Scale 0.35
Shape Size is a fraction of your timeline's short side, so the picture shape (Circle, Square, Rounded Square, Polygon or Star) is the same size in pixels, with the same margin from the frame edges, on every timeline. The window below is 35% of the short side.
| Timeline | Resolution | Default window |
|---|---|---|
| 9:16 vertical | 1080 × 1920 | 378 × 378 px |
| 4:5 portrait | 1080 × 1350 | 378 × 378 px |
| 1:1 square | 1080 × 1080 | 378 × 378 px |
| 16:9 landscape | 1920 × 1080 | 378 × 378 px |
For a card or pill that is wider than tall, choose Rounded Rectangle (or a macro from the Picture Shapes folder) and set Rectangle Height.
Installation
Installed in under a minute
Double-click the .drfx, or run the one-click installer for your system. The full walkthrough is in the Installation and Usage Guide (.rtf).
-
Close DaVinci Resolve
Quit Resolve completely so it picks up the new package on the next launch.
-
Double-click the .drfx package
Double-click
1LineArt_PiP_Collection.drfx. DaVinci Resolve asks you to confirm the installation: click Install. This works on Windows, macOS and Linux.Installer or manual install (if double-clicking does nothing, use the installer for your system above, or install by hand): a
.drfxis a zip archive. Make a copy, rename it to.zip, extract it and copy the1LineArtfolder fromEdit/Effects/into the folder for your system. Create any missing folders using the exact names shown.macOS~/Library/Application Support/Blackmagic Design/DaVinci Resolve/Fusion/Templates/Edit/Effects/Windows%APPDATA%\Blackmagic Design\DaVinci Resolve\Support\Fusion\Templates\Edit\Effects\Linux~/.local/share/DaVinciResolve/Fusion/Templates/Edit/Effects/On Windows you can paste the path straight into the File Explorer address bar.
-
Restart Resolve and find the effect
Open your project, go to the Edit page, then Effects Library → Toolbox → Effects, then 1LineArt → PiP Transitions. Seven category folders hold the 78 macros (or search "1LineArt").
On the Fusion page: apply the effect from the Edit page, then open the clip on the Fusion page.
It appears as a single group node named OneLineArtPiP, with your clip connected to its input and
the output going onward.
Quick start
From clip to animated PiP in five steps
-
Put your main footage on V1
The effect draws the PiP on a transparent background, so it needs footage underneath it.
-
Put the PiP clip on V2 or higher
Trim it to the length you want on screen — the animation starts at its first frame and ends on its last.
-
Drag the effect onto the PiP clip
From Effects Library → Toolbox → Effects → 1LineArt → PiP Transitions, drop any macro (for example 1LineArt Dynamic PiP) onto the V2 clip.
-
Adjust the five sections
Open Inspector → Fusion. Choose a Picture Shape, pick a corner with Window Anchor, and click the Border Color and Shadow Color swatches to choose any color.
-
Press play
Fine-tune timing with Zoom Speed and Border Animation (both in seconds), and the feel with the Easing Curve menus.
Quick tips
- Want a different corner? Change Window Anchor (and Mask Center to crop a different part of the clip).
- Want a calmer look? Lower Shake Motion Scale or untick Enable Transform Shake.
- Want sharp corners? Choose Square, or set Corner Radius to
0on a Rounded Square. - Want a star or polygon? Choose Star or Polygon and set Star Points, Star Depth or Polygon Sides.
- Keep the clip longer than the zoom-in and zoom-out times combined.
Questions
Frequently asked
Check that the folder 1LineArt is in …/Fusion/Templates/Edit/Effects/ (not Macros or Titles), that you installed the .drfx package or ran the installer for your system, and restart Resolve.
The effect outputs the PiP on a transparent background. Place the clip on V2 or higher with other footage on V1.
Open PIP Shape and change Picture Shape: Circle, Square, Rounded Square (the default), Polygon, Star or Rounded Rectangle. Rounded Square is the default on every timeline. Each shape only uses the controls that apply to it: Corner Radius for rounded shapes, Polygon Sides for Polygon, Star Points and Star Depth for Star.
No. Zoom and border timing are both set in seconds and converted with the timeline frame rate, so the default 0.5 s is 12 frames at 24 fps, 15 at 30 fps and 30 at 60 fps. The shake runs on a frame-rate-independent clock.
Click the Border Color or Shadow Color swatch, choose a color in the system Colors window
(wheel, sliders, palettes or eyedropper) and press OK. If a color doesn't update, reinstall the
latest .drfx package.
Yes. Every control has a keyframe diamond on its right in the Inspector.
Yes — Resolve always lets users open a Fusion group, and a plain effect file can't prevent it. All settings live in the Controls panel, so there is never a need to open it.
Give your next clip a finished PiP in seconds
Download the collection, install it with one click and start animating.