Split screens that animate themselves.
 A DaVinci Resolve Fusion macro that builds up to eight rounded windows, each with its own frame, elastic
in and out motion, and its own footage scale and position. The animation follows the clip's in and out
points, so there are no keyframes to set.
- Platforms
- Windows, macOS, Linux
- DaVinci Resolve
- Free and Studio
- Screens
- Up to 8
- Timelines
- 16:9, 9:16, square



Watch a random sample
Every visit starts with a different reel. Filter by vertical or horizontal, play another at random, or choose one from the list.
A finished multiscreen look in one drag
Six things it handles for you, so you stop building the same split screen by hand.
Up to 8 screens
Choose Active Screens and Columns for 2, 3, 4, 6 or 8 windows, side by side, stacked or in a grid.
Rounded frames
Every window has its own outline: adjustable corner radius, thickness, color and opacity.
Elastic in and out
Damped harmonic motion computed from the equation y = a(b+2x)sin(2πx) / x(b+x), in and out, driven by the layer's in and out points.
Per-screen scale and position
Each screen has its own Scale, Position X and Position Y. Footage stays inside its window, and mirrored edges fill any exposed area.
Automatic track mapping
V1 feeds Screen 1, V2 feeds Screen 2, and so on to V8, based only on the track number.
Any timeline
Positions, gaps and margins are fractions of the frame, so 16:9, 9:16 and square formats all behave.
Four groups of controls
- LayoutActive screens, columns, outer margin, gaps, image zoom and window rotation.
- ScreensOne vertical list, Screen 1 to Screen 8, each with its own Scale, Position X and Position Y.
- AnimationLength, stagger, direction, easing, and the damped harmonic and elastic settings.
- Frame and cornersCorner radius, frame thickness, color, opacity and an on/off switch.
The first 20 frames of the clip play the elastic IN, the middle holds, and the last 20 frames play the elastic OUT, with each screen offset by the stagger. Trim the Fusion Clip to the length you want and the animation follows. No keyframes are needed.
Get started
Install once, then make your first reel in five steps.
Download and install
Choose your system. Each download holds the same 75 presets as a .drfx package, plus a one-click installer and the optional AutoMap script.
Only want the package? 1LineArt Multiscreen.drfx. Only want the original macro? 1LineArt Multiscreen.setting (.zip).
Unzip the download
Unzip the Windows download and keep all the files together in one folder.
Run the installer
Double-click
Install (Windows).bat.If Windows SmartScreen appears, choose More info, then Run anyway. No admin rights are needed. It uses only PowerShell and robocopy, which are part of Windows.
Restart DaVinci Resolve
On the Fusion page, open Effects Library > Templates > Edit > Effects, in the folders starting with 1LineArt Multiscreen. The AutoMap script is under Workspace > Scripts > Comp > Multiscreen_AutoMap.
Where the files go
To remove everything the installer added: Double-click Uninstall (Windows).bat.
Unzip the download
Unzip the macOS download and keep all the files together in one folder.
Run the installer
Right-click
Install (macOS).command, choose Open, then click Open again.macOS asks this once for downloaded scripts. If it says the file cannot be run, open Terminal and run
chmod +xon the two.commandfiles. No admin rights are needed.Restart DaVinci Resolve
On the Fusion page, open Effects Library > Templates > Edit > Effects, in the folders starting with 1LineArt Multiscreen. The AutoMap script is under Workspace > Scripts > Comp > Multiscreen_AutoMap.
Where the files go
To remove everything the installer added: Run Uninstall (macOS).command the same way.
Unzip the download
Unzip the Linux download and keep all the files together in one folder.
Run the installer
Open a terminal in the unzipped folder and run
bash install.sh.No root rights are needed. It uses bash and unzip, or python3 if unzip is missing. To use a different Fusion folder, run
MULTISCREEN_FUSION_DIR=/path/to/Fusion bash install.sh.Restart DaVinci Resolve
On the Fusion page, open Effects Library > Templates > Edit > Effects, in the folders starting with 1LineArt Multiscreen. The AutoMap script is under Workspace > Scripts > Comp > Multiscreen_AutoMap.
Where the files go
To remove everything the installer added: Run bash uninstall.sh.
Prefer the .drfx? Double-click 1LineArt Multiscreen.drfx, or drag it onto the Fusion page, and confirm the prompt in DaVinci Resolve.
Then copy Multiscreen_AutoMap.lua to the Scripts > Comp folder shown above. You can always drag any preset .setting file straight into the Nodes area instead.
Why the Fusion page? The presets are Fusion compositions. Open them on the Fusion page of a Fusion Clip so all eight tracks can connect, where Resolve exposes each track as its own input.
Make your first reel
Place your clips on V1 to V8
Stack the clips directly above one another on sequential tracks. Use fewer tracks if you need fewer screens.
Trim and align
Make every clip start and end together. This range becomes the reel duration.
Create a Fusion Clip
Select all the clips, right-click, and choose New Fusion Clip. Then open it on the Fusion page.
Connect the tracks
Drag
1LineArt Multiscreen.settinginto the Nodes area. MediaIn1 to MediaIn8 arrive already wired to Screen 1 to Screen 8. If a screen stays black, run Workspace → Scripts → Comp → Multiscreen_AutoMap.Adjust and play
Set Active Screens and Columns, fine-tune each window on the Screens tab, then press play. The timing follows the Fusion Clip's own in and out points.
Tips
- Choose a screen in Highlight Screen to find its window, then set it back to None before rendering.
- Want a calmer entrance? Raise Elastic Decay or switch Easing to Smooth Ease.
- Want hard-edged windows? Set Corner Radius to
0. - Keep the clip longer than the in and out animations combined, plus the stagger.
Video track number = screen number
Resolve names the inputs of a Fusion Clip by track. The macro connects each one to the screen with the same number, so the mapping never depends on clip position, order, duration or filename.
Every clip on V3 always appears on Screen 3, however you trim, move or rearrange it.
| Video track | Fusion Clip input | Screen |
|---|---|---|
| V1 | MediaIn1 | Screen 1 |
| V2 | MediaIn2 | Screen 2 |
| V3 | MediaIn3 | Screen 3 |
| V4 | MediaIn4 | Screen 4 |
| V5 | MediaIn5 | Screen 5 |
| V6 | MediaIn6 | Screen 6 |
| V7 | MediaIn7 | Screen 7 |
| V8 | MediaIn8 | Screen 8 |
A track with no clip leaves its screen empty, and the other screens never shift. Keep tracks contiguous starting at V1.
Every control and its default
Pick a group to see what each control does and the value it starts at.
| Control | What it does | Default |
|---|---|---|
| Active Screens | How many windows are drawn (1 to 8). | 4 |
| Columns | Grid columns. Rows are calculated automatically. | 2 |
| Outer Margin | Space between the windows and the frame edge. | 0.03 |
| Gap X / Gap Y | Space between windows, measured against frame width and height. | 0.02 |
| Image Zoom | Global footage zoom applied to every screen on top of its own Scale. | 1.0 |
| Window Rotation | Rotates every window, in degrees. | 0 |
Layout presets
| Layout | Active Screens | Columns |
|---|---|---|
| 2 side by side | 2 | 2 |
| 2 stacked (vertical) | 2 | 1 |
| 3 in a row | 3 | 3 |
| 4-screen grid | 4 | 2 |
| 6-screen grid (3 × 2) | 6 | 3 |
| 6-screen grid (2 × 3, vertical) | 6 | 2 |
| 8-screen grid (4 × 2) | 8 | 4 |
| Control | What it does | Default |
|---|---|---|
| Highlight Screen | Highlights one window's frame in orange in the viewer. Set to None before rendering. | None |
| Keep Footage Inside Window | Prevents gaps: Scale below 1 acts as 1 and Position is limited to the available travel. | On |
| Reflect Edges | Mirrors the footage edges (Transform Edges = Mirror) on every screen input, so scaling down, cropping or repositioning never leaves empty areas. | On |
| Screen N Scale | Zooms the footage inside window N. Screens 1 to 8 are listed vertically on one tab. | 1.0 |
| Screen N Position X | Moves the footage left or right inside window N, in frame widths. | 0.0 |
| Screen N Position Y | Moves the footage down or up inside window N, in frame heights. | 0.0 |
Tip: right-click any control and choose Reset to Default to undo a single setting. With Keep Footage Inside Window on, a window with no spare footage in one direction cannot be moved that way until you raise Scale.
| Control | What it does | Default |
|---|---|---|
| Length | Frames used for each elastic in and out animation. | 20 |
| Stagger | Delay between screens. They enter in order and leave in the same order. | 3 |
| Animate | Animate Width, Height, or both. | Width |
| Direction | Center Out, Left › Right, Right › Left, Top › Bottom or Bottom › Top. | Center Out |
| Easing | Damped Harmonic, Elastic, Smooth Ease, Linear or Back Overshoot. | Damped Harmonic |
| Damped Amplitude (a) | Amplitude of the damped harmonic equation. 1 starts at exactly 0 and overshoots about 31%. | 1.0 |
| Damped Offset (b) | Offset of the second term in the equation. Changes how the oscillation decays. | 1.0 |
| Damped Oscillations | Whole number of cycles of x across each in and out. Whole numbers land exactly on 1. | 3 |
| Elastic Decay | Elastic easing only: higher means less bounce. | 6 |
| Elastic Frequency | Elastic easing only: number of oscillations. | 3 |
| Back Overshoot | Overshoot amount for the Back easing. | 1.7 |
For Left › Right and Right › Left, set Animate to Width. For Top › Bottom and Bottom › Top, set it to Height.
| Control | What it does | Default |
|---|---|---|
| Corner Radius | From sharp corners (0) to highly rounded (0.5). | 0.06 |
| Frames Enabled | Turns every screen's outline frame on or off. | On |
| Frame Thickness | Width of the outline. | 0.006 |
| Frame Opacity | Opacity of the outline. | 1.0 |
| Frame Red / Green / Blue | Frame color channels, 0 to 1. | 1, 1, 1 |

Damped harmonic motion, straight from the equation
The Damped Harmonic easing is not a hand-drawn curve. Every frame of the Damped In and Damped Out motion is computed from the equation below, with exact amplitude decay, oscillation frequency, phase and damping.
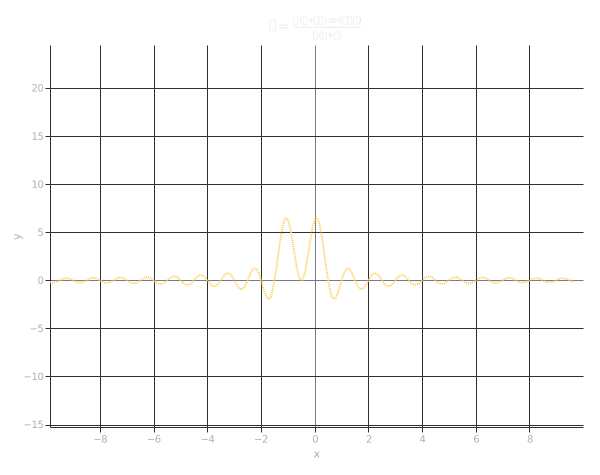
Formula for damped harmonic motion
y = a(b+2x)sin(2πx) / x(b+x)
- a
- Amplitude / scale factor. Controls the overall vertical magnitude of the function.
- b
- Offset / separation parameter. Controls the position of the second term in the original expression.
- x
- Independent variable. The input value, typically position, time or another continuously varying quantity.
- y
- Dependent variable. The output of the function for a given x.
How the equation becomes motion
- Exact decay. Since (b+2x) / x(b+x) = 1/x + 1/(x+b), the equation equals
a·sin(2πx)·(1/x + 1/(x+b)). The oscillation amplitude falls off in proportion to 1/x and the frequency stays at exactly one cycle per unit of x. - Exact start value. As x → 0, sin(2πx)/x → 2π, so y(0) = 2πa. The macro divides by 2π and uses
s = 1 − y/2π, so the screen starts at exactly 0 and settles at exactly 1. - Damped In. For the first frames of the clip, x runs from 0 to the number of oscillations N. With a whole number of oscillations, y(N) = 0, so the motion lands on 1 with no jump.
- Damped Out. The same function runs from the clip's last frame back toward its first, so the screen collapses from 1 to 0 with the identical, mirrored oscillation.
Live motion curve, computed from the equation
Peak overshoot +31% · settles in 20 frames
Timing at a glance
Simple. Dynamic. Fully Automatic. No Keyframes.
Frequently asked questions
Something not working? Start here.
Check that Active Screens is 1 or higher, that each MediaIn is connected to its Screen input, and that the macro output goes to MediaOut1. A screen with no input shows only its frame.
Set Highlight Screen to None. The orange highlight is only a viewer guide.
Keep Footage Inside Window is on. Increase Scale for room to move, or turn the option off for free movement. With Reflect Edges on, any exposed area is filled with mirrored footage.
Remove any extra Transform nodes placed in front of the Screen inputs. The macro handles scale and position itself.
Its track may be empty, or your Resolve version numbered the inputs differently. Check MediaIn1 to MediaIn8 in the node view and rewire if needed.
Drag 1LineArt Multiscreen.setting into the Nodes area on the Fusion page of the Fusion Clip, not the Edit page.
Yes. Every control, including each screen's Scale and Position, can be keyframed in the Inspector.
Give your next reel a finished multiscreen in minutes
Download the installer for Windows, macOS or Linux, then open a preset on the Fusion page and start animating.